Friday, May 27, 2011

Thoughts on NetMonitor interface

Just to remind, here is the look of the current version of NetMonitor. There is no UI for managing the list of hosts, adding a new one or configuring the existing ones. The list of hosts are set in the application configuration file.

NetMonitor

I keep thinking on NetMonitor’s user interface, especially on editing screens. Moreover, I’m trying to imagine good system tray icon, that won’t be annoying but informative. During my life as a computer user I tried thousands of software programs, lot’s of them had really crappy UI while only several were more or less usable.

For now I have selected the following patterns:

List management

ListManagement

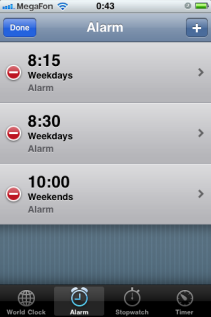
This is Alarms page from Clock application from iOS. The window shows a list of alarms, activation checkbox for each of them and 2 buttons on top that switch the screen: Edit mode and Add mode. No main menu, no toolbar are required. The UI is slick and simple to use.
The only question left is whether to keep those checkboxes on this screen or to move them to the host edit screen. As for alarms, the placement is right, so people could switch alarms on and off with ease, but what about hosts? How often users will enable and disable monitoring a host? The monitoring won’t wake you up early in the morning just because you forgot to switch it off. So, I tend to decide that the checkboxes should be put on the host configuration screen.

List edit mode
ListEdit

This window shows the same list of alarms but with different controls for each of them. Left red circle deletes an alarm, right arrow switches the window to the alarm configuration mode. Left top button is replaced with Done button that saves the result of list editing. However, the Delete control doesn’t deletes an item immediately, it displays sort of confirmation, like this:

ListDeleteItem

Note that the Delete button appear instead of right arrow. This proves that Apple software developers and interface engineers took into account every little detail so a customer feel comfortable with the UI.

Item edit mode

The screen that provides configuration details for an alarm. Here you can’t switch it on or off, just set up the alarm time, repeat mode, alarm name and snooze mode. Top buttons are: Save & Cancel.

ItemEdit

One more observation that might be interesting: if you noticed, the left top button from the main screen named Edit opens list management screen and the button Done there is located exactly on the same place as the button Edit. The same is true for alarm addition screen: button Add opens the Add alarm screen and the button Save is located right there, where button Add was. I think that this was done intentionally, after hundreds options and thorough UI testing.

Windows taskbar & system tray integration

NetMonitor is extremely lightweight, it is more like a tiny utility than a ordinary windows application, that’s why I suppose that it should sit in the system tray rather than in Windows taskbar. If so, then there is one utility which behavior I like -- network information popup window that shows currently available networks. It looks like this:

Networks

It is displayed after clicking on its tray icon and disappears after loosing the focus or after the second click on the icon. The elements I like here are: support of groups of items (collapsing and expanding groups, see up arrows), and network signal strength icon. The icon is displayed only for Wireless connections, so you might not be able to see it on your connected to a LAN computer. The only problem is that usage of similar icon is not a good idea, not only because the icon is the property of Microsoft, but mostly because users might get confused for 2 identical icons in their system trays. Another option to use a traffic light icon in the system tray, but I doubt whether this will be that informative.

Having described the future UI changes, I could proceed with the implementation. As soon as I have something to show, I’ll share the results.

Wednesday, May 11, 2011

Bye, Bye, Reflector

Greedy people from Red Gate Software, who had bought the Reflector tool and promised that it would always be free but failed, meet DotPeek, a free standalone .NET decompiler from JetBrains.

Thursday, March 3, 2011

NetMonitor. Discovering network configuration

It’s time to add some value to the project. For a long time I’ve been thinking about the UI for adding/editing/removing hosts and I’m still not sure which one will be good enough. As a  result, I’ve delayed this interface for further steps, today I’ll show how to discover network configuration of a computer and find out IP addresses of gateway, DNS servers, etc. to fill in the list of hosts.

The Base Class Library (BCL) doesn’t contain any network configuration-related classes mostly because it must be platform independent. So we have to interoperate somehow with machine-dependent components such as Windows Management Instrumentation (WMI). Luckily, BCL provides the System.Management.ManagementClass type which will help. In order to read network adapter’s configuration we will use “Win32_NetworkAdapterConfiguration” WMI class.

        // Creating the desired WMI class
        var mc = new ManagementClass("Win32_NetworkAdapterConfiguration");
        // Getting all instances of the specified WMI class
        var items = mc.GetInstances();

Having fetched all instances of WMI class we read the required properties and form the list of hosts. The properties that are interesting for us are:

  • DefaultIPGateway
  • DHCPServer
  • DNSServerSearchOrder
  • WINSPrimaryServer
  • WINSSecondaryServer

Here is the code:

        var gateList = new HashSet();
        var dnsList = new HashSet();
        var dhcpList = new HashSet();
        var winsList = new HashSet();

        foreach (var item in items) {
          // Skipping devices that are not IP-enabled
          if (!((bool)item["ipEnabled"]))
            continue;

          var addresses = (string[])item["DefaultIPGateway"];
          if (addresses != null && addresses.Length > 0)
            foreach (var gw in addresses)
              gateList.Add(gw);

          addresses = (string[])item["DNSServerSearchOrder"];
          if (addresses != null && addresses.Length > 0)
            foreach (var dns in addresses)
              dnsList.Add(dns);

          string dhcp = (string)item["DHCPServer"];
          if (!string.IsNullOrEmpty(dhcp))
            dhcpList.Add(dhcp);

          string wins1 = (string)item["WINSPrimaryServer"];
          if (!string.IsNullOrEmpty(wins1))
            winsList.Add(wins1);

          string wins2 = (string)item["WINSSecondaryServer"];
          if (!string.IsNullOrEmpty(wins2))
            winsList.Add(wins2);
        }

        foreach (var address in gateList)
          Hosts.Add(new HostViewModel(address, "Gateway"));
        foreach (var address in dnsList)
          Hosts.Add(new HostViewModel(address, "DNS"));
        foreach (var address in dhcpList)
          Hosts.Add(new HostViewModel(address, "DHCP"));
        foreach (var address in winsList)
          Hosts.Add(new HostViewModel(address, "WINS"));

Depending on the number and configuration of your network interfaces, the NetMonitor will automatically discover and fill in the list of hosts to monitor.

Here are my automatically discovered hosts. As you see, my Wi-Fi router also acts like a DNS server & a DHCP server, the other two DNS servers (10.0.0.x) are provided by additional VPN connection. BTW, it might be a good idea to remove duplicate entries from the list.

NetMonitor

Download latest binaries or play with the code.

Friday, February 4, 2011

NetMonitor. Implementing IDisposable pattern

The `IDisposable` pattern and its correct usage often are the subject of flaming discussions. At least among those developers, who are aware of its existence. Oh, sorry. Truth be told, the pattern had been the subject of discussions, but after the exciting and extremely detailed article on the topic was published by fathers of .NET, CLR, etc., the only thing left for us was to follow their wise recommendations.

And so did I, because `NetMonitor.PingService` uses `Threading.Timer` & `NetworkInformation.Ping` types which implement `IDisposable` by themselves. Here is how the canonic `IDisposable` implementation looks like, applying for `PingService` class:

    public void Dispose()
    {
        Dispose(true);
        GC.SuppressFinalize(this);
    }

    private void Dispose(bool disposing)
    {
      if (isDisposed)
        return;

      if (!disposing)
        return;

      if (IsRunning)
        Stop();

      if (timer != null)
        timer.Dispose();
      if (ping != null)
        ping.Dispose();

      isDisposed = true;
    }

    ~PingService()
    {
      Dispose(false);
    }

Note the presence of a finalizer, 2 working modes of Dispose method, etc. All this stuff is explained with uncompromising details in the above-mentioned article. Great reading, don’t miss it.

Thursday, January 27, 2011

NetMonitor. Making UI more efficient

After releasing the first more-or-less useful version of NetMonitor, I’ve been playing with it in different environments and situations, trying to realize whether the current UI is efficient enough for providing useful information about the network health in a form that can be grasped quickly, without spending noticeable amount of time on data parsing and understanding. Also, I’ve been observing the usage of controls that are located at the main window.

Here is how it looked originally:

 NetMonitor UI zones

After a week or two, I’ve made the following observations:

1. Buttons “Start” & “Stop” in this tiny application are useless at all. I’ve noticed that while I had to push “Start” button in order to begin the monitoring process, I never pushed “Stop” button when I wanted to stop the monitoring, because closing the application seemed more natural to me as a regular user. Also, I’ve realized that pushing “Start” button is the excess step, I’d prefer an application, at least this simple one, would start functioning immediately, without additional clicks. So, I’m removing the toolbar with the buttons and launching the monitoring right from the start.

2. Information that is presented in Data panel was also a subject for the investigation. I realized that some columns are more important and other are less. For example, columns “Host” and “Response time” were those I paid much attention to, while “Address” and “Health” were less convenient for me. As for “Host” vs. “Address”: I think that a human-being prefers to operate with more natural textual names for hosts instead of IPs or internet addresses with those “www”, “com”, etc. Moreover, internet address is required for application only, a user wants to know how much is response time for “my router”, “my vpn server”, “my website”, etc., and not for “192.168.0.1”, “10.0.0.66” or other stuff constructed from weird combination of digits and dots.

NetMonitor important columns

So, first of all I’ve removed the toolbar. That was rather easy and didn’t take much time. The most difficult task was how to reorganize the data presentation to provide better visualization. I’ve been experimenting with various patterns and understood that there couldn’t be a good solution unless I refuse using DataGrid as a presentation pattern. So I began probing with direct item templates for `ListView` control. After a while a fresh new look for NetMonitor was born:

Fresh new look for NetMonitor

This information layout focuses on the important data: human readable host names and response time, while other potentially useful information such as IP address, is less expressed. Moreover, the important pieces of data are located closer to each other and it is more convenient for eyes and brain to grasp the connected pieces of information.

The solution was simple. I removed `ListView.View` and nested `GridView` nodes and add a DataTemplate for a ListView. Nothing special:

<ListView.ItemTemplate>
  <DataTemplate>
    <Grid>
      <Grid.ColumnDefinitions>
        <ColumnDefinition />
        <ColumnDefinition />
      </Grid.ColumnDefinitions>
      <Grid.RowDefinitions>
        <RowDefinition />
        <RowDefinition />
      </Grid.RowDefinitions>
      <TextBlock Grid.Row="0" Grid.Column="0" Text="{Binding Name}"
         FontSize="18.667" Margin="5,0,0,0" />
      <TextBlock Grid.Row="0" Grid.Column="1" Text="{Binding ResponseTime}"
         FontSize="18.667" HorizontalAlignment="Right" Margin="0,0,5,0" />
      <TextBlock Grid.Row="1" Grid.Column="0" Text="{Binding Address}"
         FontSize="10.667" Margin="5,0,0,5" />
      <TextBlock Grid.Row="1" Grid.Column="1" Text="ping"
         FontSize="10.667" HorizontalAlignment="Right" Margin="0,0,5,5" />
    </Grid>
  </DataTemplate>
</ListView.ItemTemplate>

After that small achievement I got closer to the point of feeling the dark power of WPF =)

P.S.
The repository is updated, binaries are available here, as usual.

Thursday, January 20, 2011

Gosh! Someone is damn good at support

support.x-tensive.com

Just a funny case, notice the amount of karma =)

Friday, January 14, 2011

NetMonitor. Making application configurable

After we made the application working, the next step is to make it configurable, so a user won’t need to recompile the program when he wants to add or modify a host.

This step is rather easy to implement, although personally I don’t like .NET configuration and prefer INI-files based one, in this particular scenario I’m choosing the standard one. So, in order to map a collection of HostViewModel items, I’ve added HostConfigurationElement, HostConfigurationElementCollection & MainSection types. While working on this task, I’ve found absolutely fabulous and useful .NET configuration guide, which I recommend to everyone. The guide consists of 3 big parts: Unraveling, Decoding & Cracking the Mysteries of .NET 2.0 Configuration, don’t miss it.

So, having configuration-related types done, I got the ability to move host-related data to application configuration file:

<?xml version="1.0" encoding="utf-8" ?>
<configuration>
  <configSections>
    <section name="NetMonitor.Main" type="NetMonitor.Configuration.MainSection, NetMonitor, Version=1.0.0.0, Culture=neutral, PublicKeyToken=null" />
  </configSections>
  <NetMonitor.Main>
    <hosts>
      <host name="Wi-Fi Router" address="192.168.1.1"/>
      <host name="Gate" address="10.1.8.2"/>
      <host name="VPN Server" address="10.0.0.66"/>
      <host name="DNS Server" address="10.0.0.1"/>
      <host name="Google" address="google.com"/>
      <host name="Yahoo" address="yahoo.com"/>
    </hosts>
  </NetMonitor.Main>
</configuration>

After the application has been made configurable, it might become useful not only for me, but for somebody else. Therefore, I’ve built it and uploaded here for those who might be interested in using it. In this public version I removed personal hosts such as wi-fi router, gate, etc., because they don’t make any sense to anyone, except me.

Next time I’m going to make some changes to the UI, as there are tons of tasks to be done to get really useful piece of software, even to this tiny one.